# Node.js + GitHub Webhooks实现自动化部署
博客已经成功部署到云服务器了,但是还有一个问题需要解决。
👉博客的文章增加、修改等都在个人PC上完成,并且本地有开发环境,编译之后生成的适合生产环境的项目源码会提交到GitHub上的远程仓库。此时博客已迁移到了云服务器上,为了使云服务器上的代码的版本保持最新,我有想到三个操作:👇
- 1、远程登录云服务器手动更新;
- 2、为服务器设置定时脚本,比如每隔24小时执行一次,与GitHub上的仓库同步;
- 3、建立某种自动更新机制,代码更新到GitHub仓库之后让云服务器这边触发同步。
第一个操作明显繁琐,不符合懒人需求🤣,第二个操作定时脚本可以用用,但明显第三个才是出路啊。。
# 一、GitHub WebHooks
GitHub Webhooks是GitHub提供的一个API,如果为一个GitHub上的一个远程仓库配置了Webhooks,当有人往这个远程仓库push代码完成后,GitHub会往Webhooks里配置的地址发送一个POST请求,并在body中给出本次更新的仓库信息、更新的文件等信息。
这个post请求相当于一个通知,我们收到post请求后可以对服务器端的本地仓库进行更新,拉取·个 GitHub上的最新代码,从而实现一次提交,服务器端自动化部署。
展开查看详情
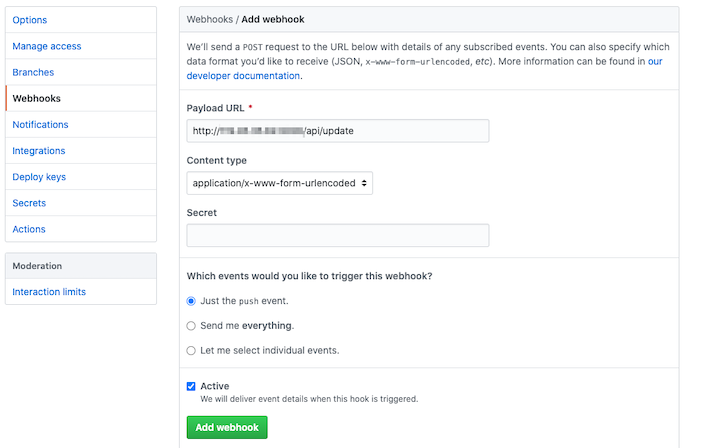
配置GitHub Webhooks:进入一个仓库 -> 右上角Settings -> 侧边栏Webhooks。
一次push时Webhooks返回的部分数据:👇

# 二、使用node.js搭建服务
说实话这是第一次正经使用node.js。。
以下为一个简单的
POST请求实例代码。完整的项目源码在此 (opens new window) ,引入了日志功能,可以记录服务的常规和异常信息。
# 1.写个DEMO测试一下
// config.js
module.exports = {
  HOST: "127.0.0.1",
  PORT: 9000
};

// server.js
const express = require('express');
const bodyParser = require('body-parser');
const cors = require('cors');// 跨域
const server = express();

const config = require('./config');// 配置 config.js
const HOST = config.HOST;
const PORT = config.PORT;

server.use(bodyParser.json());
server.use(bodyParser.urlencoded({extended: true}));
server.use(cors());

server.post('/api/update', (request, response) => {
  console.log(request.body);
  response.json(request.body);
});

server.listen({
  host: HOST,
  port: PORT
}, function () {
  console.log(`Server is running in http://${HOST}:${PORT}`);
});
2
3
4
5
6
7
8
9
10
11
12
13
14
15
16
17
18
19
20
21
22
23
24
25
26
27
28
29
30
31
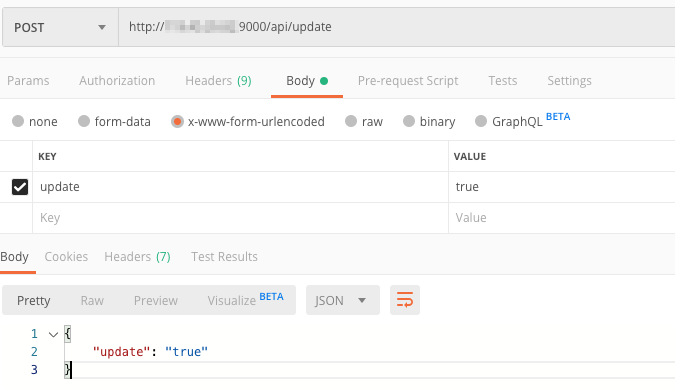
安装必要依赖后执行node server.js,在Postman中模拟一次请求,如下,成功收到响应!
# 2.接着完善一下
主要增加了:
- 将命令整合至
update.sh脚本,并通过node.js相关API调用;- 从
body中获取更新的仓库名并将其作为一个参数传入脚本,这样服务可以应用于多个仓库。
展开查看源码
# 项目文件结构
.node-update
├── static
│   ├── server.js
│   ├── config.js
│   └── update.sh
└── package.json
2
3
4
5
6
# server.js服务本体
// server.js
const express = require('express');
const bodyParser = require('body-parser');
const cors = require('cors');// 跨域
const server = express();
const spawn = require('child_process').spawn;

const config = require('./config');// 配置 config.js
const HOST = config.HOST;
const PORT = config.PORT;

server.use(bodyParser.json());
server.use(bodyParser.urlencoded({extended: true}));
server.use(cors());

// github webhooks 需选用 x-www-form-urlencoded
server.post('/api/update', (request, response) => {
  if (request) {
    // console.log(request.body);
    const repoName = JSON.parse(request.body.payload).repository.name
    const cmd = `/documents/GitHub/${repoName}`;// 本地仓库地址

    let res = '';
    // 调用命令行,执行命令(sh update.sh),并给update.sh传递一个参数cmd
    const process = spawn('sh', ['update.sh', cmd]);
    process.stdout.on('data', function (data) {
      const ds = data.toString();
      // console.log(ds);
      res += ds;
    });

    process.stderr.on('data', function (data) {
      const ds = data.toString();
      // console.log(ds);
    });
    response.json(res);
  }

  // response.json(request.body);
});

server.listen({
  host: HOST,
  port: PORT
}, function () {
  console.log(`Server is running in http://${HOST}:${PORT}`);
});
2
3
4
5
6
7
8
9
10
11
12
13
14
15
16
17
18
19
20
21
22
23
24
25
26
27
28
29
30
31
32
33
34
35
36
37
38
39
40
41
42
43
44
45
46
47
48
# update.sh更新脚本
# update.sh
echo 'start update...'
# echo $1
cd $1 # 接收传入的参数 即地址

# 拉取更新
git fetch --all
git reset --hard origin/master

# 获取最新代码合并到本地
# git pull origin

echo 'update complete!'
2
3
4
5
6
7
8
9
10
11
12
13
# package.json
{
  "name": "node-update",
  "version": "1.0.0",
  "description": "",
  "main": "server.js",
  "scripts": {
    "server": "cd static && nodemon server.js"
  },
  "author": "",
  "license": "ISC",
  "dependencies": {
    "body-parser": "^1.19.0",
    "cors": "^2.8.5",
    "express": "^4.17.1",
    "nodemon": "^1.11.0",
    "winston": "^3.2.1",
    "winston-daily-rotate-file": "^4.4.2"
  }
}
2
3
4
5
6
7
8
9
10
11
12
13
14
15
16
17
18
19
# 三、将服务部署至服务器
# 1.运行前的配置
- 1.设置
config.js👇,HOST为服务的IP,PORT填写服务的端口。注意事项
- 需要确保填写的端口正确开通并暴露在公网,需设置防火墙(Windows)或安全组(云服务器);
- 云服务器的话
HOST需要填写服务器的内网地址,填写公网地址将会报错;- 服务器需安装
node.js环境,参考CentOS下配置Node.js和Nginx环境... module.exports = { HOST: "127.0.0.1",// 云服务器要填写该服务器的内网IP PORT: 9000, logger: logger// 日志 }; ...1
2
3
4
5
6
7
- 2.设置
server.js这里需要配置服务器上的本地仓库的绝对地址。
...
const repoName = JSON.parse(request.body.payload).repository.name
const cmd = `/documents/GitHub/${repoName}`;// 本地仓库地址
...
1
2
3
4
将文件传至服务器,在命令行中进入该目录,执行下面命令。
npm install # 安装依赖
npm run server # 运行服务
2
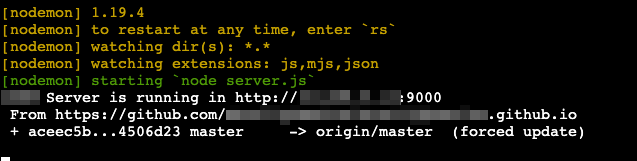
一次POST请求打印出的信息👇

# 2.实现服务端常驻
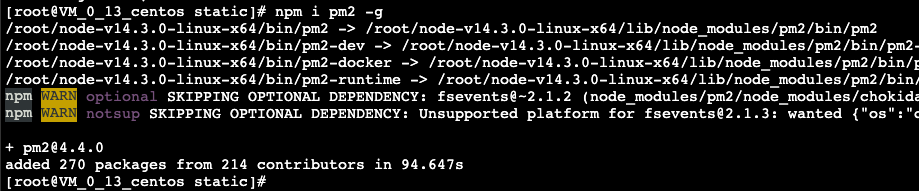
npm run server只能实现服务的开发环境下的调试部署,要想实现服务的常驻,需要安装pm2。
运行npm i pm2 -g全局安装pm2,下面第一图中可以看到安装的路径。
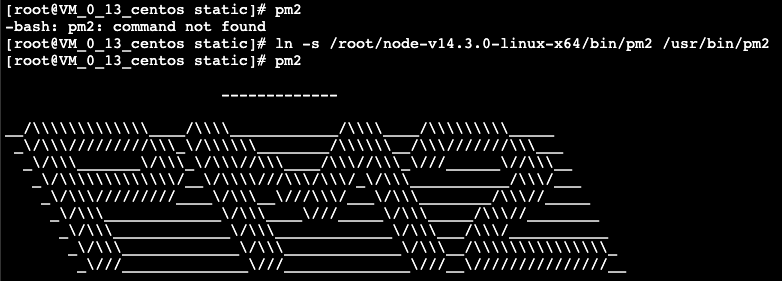
pm2 # 尝试调用,发现没有用

# 将安装路径中的pm2建立软链接到全局路径,将pm2设置为全局命令
ln -s /root/node-v14.3.0-linux-x64/bin/pm2 /usr/bin/pm2
pm2 # 成功
2
3
4
5
cd static # 进入static目录
pm2 start server.js # 运行server.js并常驻
2

# 3.pm2常用命令
- 查看当前使用
pm2常驻的服务:pm2 list - 启动服务:
pm2 start example.js - 重启服务:
pm2 restart example.js - 停止服务:
pm2 stop all/pm2 stop 0/pm2 stop example.js - 查看编号0的服务:
pm2 show 0 - 监控服务:
pm2 monit/pm2 monit 0/pm2 monit example.js - 打印日志:
pm2 logs/pm2 logs 0/pm2 logs example.js
# 四、遇到的问题
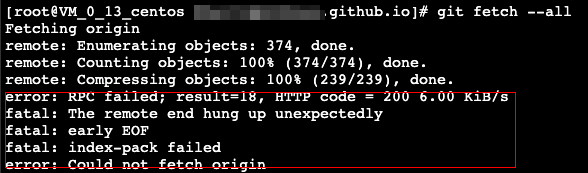
# 拉取远程仓库代码失败
错误提示:
error: PRC failed; result=18, HTTP code = 200、fatal: The remote end hung up unexpectedly、fatal: early EOF、fatal: index-pack failed、error: could not fetch origin。
搜索一番,需要修改Git的传输字节大小设置。
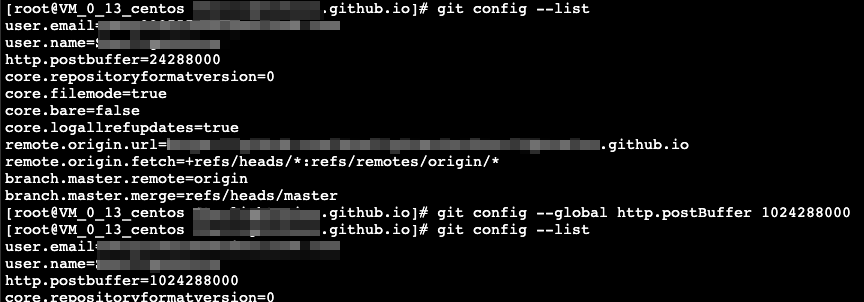
git config --list # 查看 http.postbuffer

# 修改 http.postbuffer 为 1024288000
git config --global http.postBuffer 1024288000
git config --list # 再次查看
2
3
4
5