# VuePress之开发自己的插件
VuePress默认主题自带有一个last-updated插件,可以获取提交的时间戳并将其展示在页面底部。但是这个时间戳展示的是最后更新的时间,≠该博文创建的时间。除此之外,我还想展示此篇博文标注的标签内容。
搞个性化,也不能千篇一律。。
需求有了,接下来就是研究可行性。
# 一、可行性
VuePress由Vue、Vue Router和webpack驱动。
可以在Markdown中使用Vue语法 (opens new window)一文中找到相关资料,可以使用Vue开发自定组件。
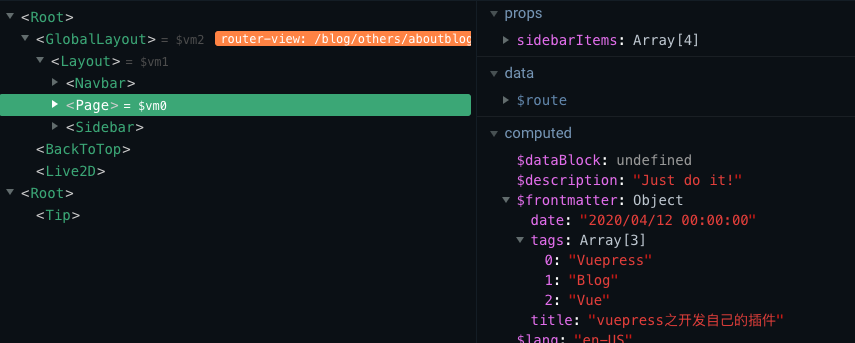
数据来源👇
可以使用
vue-devtools查看到,在<Page>组件中有一个$frontmatter,这个对象内部存放有写在每一篇博文开头的标注内容(下图👇),如title等,可以自定key和value,往里面加入此篇博文的数据。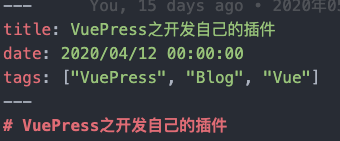
# 二、尝试打印标注里的数据
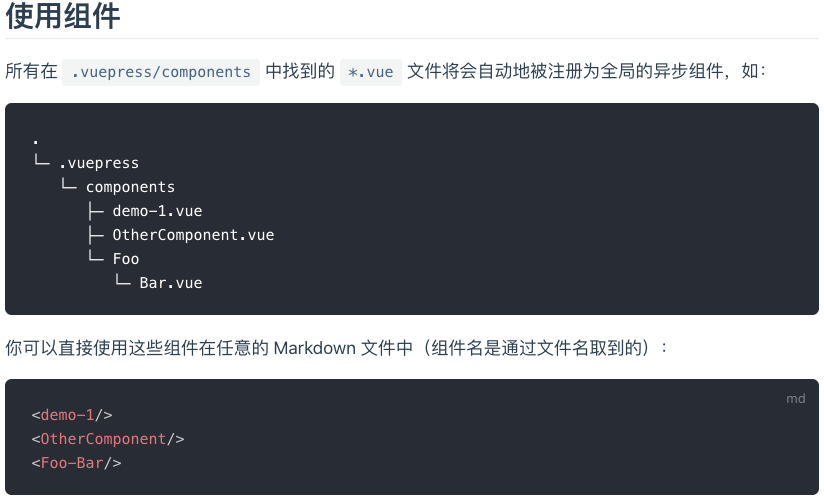
在
.vuepress目录下,新建一个components文件夹,自己写的组件放入其中。通过文档可知,在.vuepress/components中的.vue文件会被注册为全局组件,而且可以直接在Markdown中使用。
首先在components目录中新建一个DisplayBar.vue,写入:👇
<!-- DisplayBar.vue -->
<template>
  <div class="display-bar"></div>
</template>

<script>
export default {
  name: 'DisplayBar',
  props: {
    displayData: { type: Object }
  },
  data () {
    return {}
  },
  mounted () {
    if (this.displayData) {
    	console.log(this.displayData);
    }
  }
}
</script>
1
2
3
4
5
6
7
8
9
10
11
12
13
14
15
16
17
18
19
20
21
2
3
4
5
6
7
8
9
10
11
12
13
14
15
16
17
18
19
20
21
在一个.md文件中写入:👇
<!-- .md -->
---
title: VuePress之开发自己的插件
date: 2020/04/12 00:00:00
tags: ["VuePress", "Blog", "Vue"]
---

# VuePress之开发自己的插件

<ClientOnly>
  <display-bar :displayData="$frontmatter"></display-bar>
</ClientOnly>
1
2
3
4
5
6
7
8
9
10
11
12
2
3
4
5
6
7
8
9
10
11
12
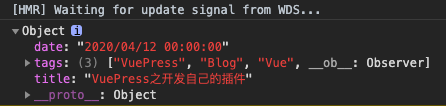
随后重启VuePress,在命令行中按Ctrl + c退出当前进程(必须手动重启,热更新可能会出错),命令行中键入npm run dev后重新回到此页,从控制台可以看到成功打印出写入到标注内的数据!!
# 三、完善DisplayBar.vue
从阿里图标库选择合适的图标下载,将.css拷贝至博客项目文件夹,在config.js中引入:
// config.js

module.exports = {
  ...
  head: [
    ['link', { rel: 'icon', href: '/logo.ico' }],
    ['link', { rel: 'manifest', href: '/manifest.json' }],
    ['link', { rel: 'apple-touch-icon', href: '/logo.png' }],
    ['link', { rel: 'stylesheet', href: '/assets/css/iconfont.css' }],
  ],
  ...
}
1
2
3
4
5
6
7
8
9
10
11
12
2
3
4
5
6
7
8
9
10
11
12
源码在下面:👇
展开查看源码
<!-- DisplayBar.vue -->
<template>
  <div class="display-bar">
    <div
      class="bar-item"
      v-if="createTime.length > 0"
    >
      <span class="iconfont icon-time"></span>
      <span>{{createTime}}</span>
    </div>

    <div
      class="bar-item"
      v-if="tags.length > 0"
    >
      <span class="iconfont icon-tag"></span>
      <span
        v-for="(item, key) in tags"
        :key="key"
      >
        {{item.trim()}}
  	  </span>
    </div>
  </div>
</template>

<script>
export default {
  name: 'DisplayBar',
  props: {
    displayData: { type: Object }
  },
  data () {
    return {
      tags: '',
      createTime: ''
    }
  },
  mounted () {
    if (this.displayData) {
      // 标签
      this.tags = this.displayData.tags.length ? this.displayData.tags : [];

      // 时间
      this.createTime = this.displayData.date;
    } else {
      this.tags = [];
      this.createTime = '';
    }

    // console.log(this.displayData);
  }
}
</script>

<style lang="stylus">
  .display-bar
    display flex
    color rgba(0,0,0,.54)
    font-size 0.8rem
    font-weight 400

    span:not(.iconfont)
      cursor pointer
      font-style italic

    span:not(.iconfont):hover
      color $accentColor

    .iconfont
      font-size 0.8rem
      font-weight 600

    .bar-item
      margin-right 1.25rem

    .icon-time + span
      margin-left 0.125rem

    .icon-tag ~ span
      margin: 0 0.125rem
</style>
1
2
3
4
5
6
7
8
9
10
11
12
13
14
15
16
17
18
19
20
21
22
23
24
25
26
27
28
29
30
31
32
33
34
35
36
37
38
39
40
41
42
43
44
45
46
47
48
49
50
51
52
53
54
55
56
57
58
59
60
61
62
63
64
65
66
67
68
69
70
71
72
73
74
75
76
77
78
79
80
81
82
2
3
4
5
6
7
8
9
10
11
12
13
14
15
16
17
18
19
20
21
22
23
24
25
26
27
28
29
30
31
32
33
34
35
36
37
38
39
40
41
42
43
44
45
46
47
48
49
50
51
52
53
54
55
56
57
58
59
60
61
62
63
64
65
66
67
68
69
70
71
72
73
74
75
76
77
78
79
80
81
82
上面使用了CSS预处理器stylus,这样可以继承在palette.styl中设置的主题色$accentColor(行中已高亮)。
具体效果看本篇博文大标题下的那一行就行了。。